|
How to install VIP Task Manager on one computer and multiple computers in the network with or without dedicated server
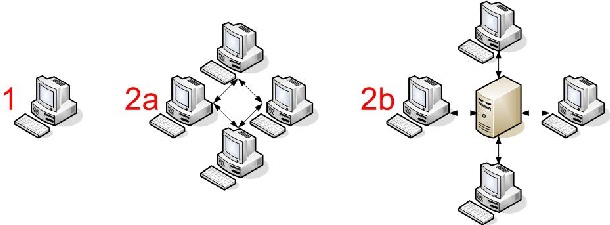
VIP Task Manager can be used both as multi-user software and single user software. As multi-user software it can be used in networks either with dedicated server computer or without it. So, basically, there are three ways of VIP Task Manager installation:

1. Single user installation
2a. Multi-user installation in networks without dedicated server
2b. Multi-user installation in networks with dedicated server computer
1. Single user installation
If you are the only user of VIP Task Manager or you are going to test the product on your computer for a start, please, double click installation file, then click NEXT button all the way through till you reach the final window and click INSTALL button. After installation, please, start the program and click NEXT button all the way through till you reach the final window where you need to click FINISH button and login under Admin account.
In case the default installation doesn’t work for you or you have any questions, please, check our detailed step-by-step installation guide or contact us right now and we will help you ASAP.
2. Multi-user installation in networks without dedicated server computer
If you don’t have a dedicated server computer in your network, you can use one of your personal computers as a “server” computer (to keep the database on it) and other computers as “clients” (to let other users connect to the database at the same time).
1. On “Server” PC, please, double click installation file and click NEXT button all the way through till you reach the final window where you need to click INSTALL button. After installation, please, start the program and click NEXT button all the way through till you reach the final window where you need to click FINISH button (when you open SAMPLE database or create a new one, you need to create user accounts to let other users login the database).
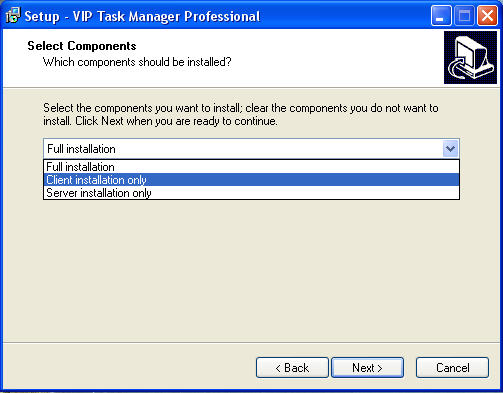
2. On “Client” PCs, please, double click installation file and click NEXT button till you reach the following window:

Select option “Client installation only” and continue clicking NEXT button all the way through till you reach the final window where you need to click INSTALL button. After installation, please, start the program, go on clicking NEXT button to connect to the server and the database, and then click FINISH button to login under your user account.
In case the default installation doesn’t work for you or you have any questions, please, check our detailed step-by-step installation guide or contact us right now and we will help you ASAP .
3. Multi-user installation in networks with dedicated server computer
If you have a dedicated server computer in your network, you can install “server application” on your server computer (to keep the database on it) and “client application” on user PCs (to let users connect to the database on the server computer from their PCs).
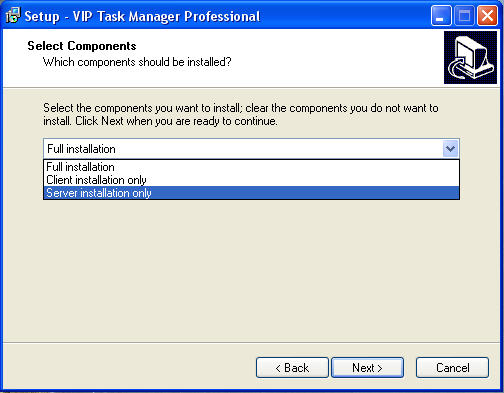
1. On dedicated server computer, please, double click installation file and click NEXT button till you reach the following window:

Select option “Server installation only” and continue clicking NEXT button all the way through till you reach the final window where you need to click INSTALL button.
2. On user PCs, please, double click installation file and click NEXT button till you reach the following window:

Select option “Client installation only” and continue clicking NEXT button all the way through till you reach the final window where you need to click INSTALL button.
After installation, please, start the program on any user PC and go on clicking NEXT button to connect to the server and the database, and then click FINISH button (when you open SAMPLE database or create a new one under Admin account, you need to create user accounts to let other users login the database).
In case the default installation doesn’t work for you or you have any questions, please, check our detailed step-by-step installation guide or contact us right now and we will help you ASAP.


|
